Thursday 28 January 2016

Task 2 - Lip Sync Animation


Task 2 Lip Sync Animation

The voice clip I used was from The Matrix where Mr Anderson is being interrogated by an Agent. I chose it because between the dialect, it gave me the opportunity to really characterise the rig. To put my own take on it. Without hiding from the truth, I did struggle with this. Not the technicalities of the lip-sync itself, but the acting involved with the eyes and brows.

I spent a large amount of time adding emphasis on words, eye movements and head rolls to really attempt to sell the appeal of the character to my audience. I gained peer feedback from one member out of my class, which I would have really liked more with this animation. 

I did feel I got nearly, if not all the 12 principles of animation in there which really strained my abilities. It was a fantastic learning curve however. Beneath is the peer feedback I gained. I also found out that the playbast in Maya can make the audio file off sync and when I rendered it, I had to crop and change the audio in some places to make the facial animations fit. 
 

Part 6 - Heavy Lift Animation

 
Part 6 - Heavy Lift Animation
 
 
This animation was without a doubt the biggest time sync out of all the scenarios that was given to me. It was the ending of the animation predominately that stretched out the timescale, but there was other blips that accumulated to this problem also. There is a lot of character to this animation which to me, makes it much more believable also.
Due to good referencing, the first 135 frames were simple enough. Its after this point my animation reached a stage where I no longer had any images to work off and so I had to design the ending myself. I was lucky enough that my step father was travelling abroad and with a very large, heavy suitcase so I got some great pictures to start with though.
 
The issue I had was when the character picks up the suitcase, when trying to get underneath it the only way to keep the objects weight was to turn away from the camera. Forcing him to turn away from the camera would require a camera shift when rendering. Ultimately, due to time constrictions I scrapped this ending and had the rig panting after trying to lift the first few times.

The other inconsistency was the feet. The way the model turns during the animation required grounding the feet in certain positions. These were rectified from the original frames as the speed of the transitions wouldn't have allowed the twisting through the knees and feet.


Part 5 - Idle Pose Animation


Part 5 - Idle Pose Animation
 
 
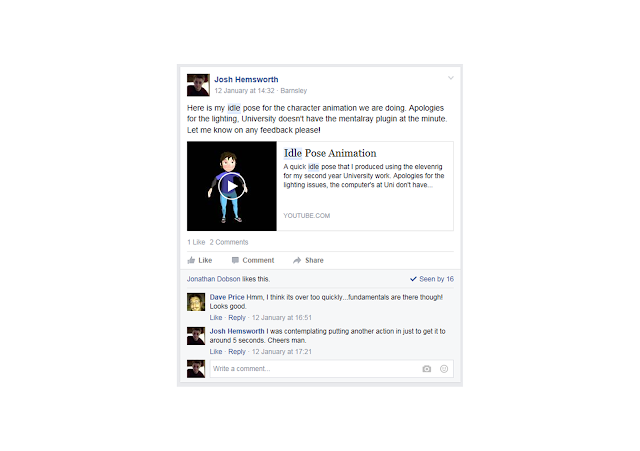
The final version of this animation I was very happy with, as I managed to get the timing and spacing down. I tried with all my rigs to change the shape and gender to get diversity whilst practicing. This animation is a more overweight character who gives off quite a lazy vibe. Previous animation have been mid build, skinny female, a male muscly superhero etc. This animation is a large yawn and stretch, followed by a chest rub/scratch.
 
 
Motion trails worked an absolute charm to help form the arms being brought up from a folded position. This shows off a nice arc to start the animation with.
In all honesty, I didn't struggle with this animation which was a good sign, as my work flow has started drastically increasing as I have been reading through the Williams Survival Guide and picking out little bits that need doing that I would have previously been ignorant about.
 
 Below is my peer feedback, which again is a little frustrating as I still only gained feedback from one:
 
 
I lengthened out the animation as stated, adding more weight shifts and head movement to prolong it. This was a milestone for me with animation though as I really started to get a good workflow and pace, understand the relevance in real time to the amount of key frames and how long certain actions should take. (24frames =1 second)


Part 4 - Superhero Punch Animation

 
Part 4 - Superhero Punch Animation
 
 
This was one of the most engaging animations I worked on. Prior to this animation, my other three have been based solely on technicalities and not adding and character. With the nature of this clip, I could experiment with many principles, especially squash and stretch which would lead to the
character showing through.
 
The poses go from a squashed curled position, jumping up, punching with a stretch and landing into a strong superhero position with fists on the side of his waist. The main area that required work on this clip was definitely the positioning of the right fist. Getting this part in the right position through the ascent and descent in an arch like motion was difficult, even with a motion trail path. I think this is because I really struggle with my timing. I feel I am strong with the technicalities and getting good positions, but my timing is usually the most time consuming part of my animations. I could literally spend a good week trying to work out spacing to get drag and overlap on my characters.
 
 
Below is my peer feedback which I incorporated into my work, which was refreshing to get more this time around.


As Dave pointed out, the elbow was rectified. This was occurring due to the previously mentioned problem, the hand and its positioning. After spending so much time focusing on this area, I left out the elbows. (Lesson learnt number 2).
 Shannon then pointed out the leg popping which is when the character rises again and settles. Kneecaps are as important as elbow joints, don't forget about them as they can really affect the overall look of the rig. I originally thought it was something wrong with the torso movement, which goes to show the minute details that can really affect it. With a little more time, I would have liked to do the starting pose prior to winding the body in a squash position. This would have ultimately gave a much stronger, burst with a delay in the start of the animation with a quick explosive punch burst in the middle.
 
 
Here the stretch stage at mid punch can be seen, and just exactly how much I exaggerated it. This is not noticeable when watching, but after trying without the stretch it looks wrong.


Part 3 - Female Walk Cycle Animation

 
Part 3 - Female Walk Cycle Animation
 
 
I did thoroughly enjoy this animation from start to finish, as It was at this point of the assignment I discovered Richard Williams' book: ''The Animators Survival Kit''. This showed how to add everything related to spacing, timing, blocking, delay, exaggeration, overlapping, you name it, this book shows how its done. Below you can see my working on the cycle with Williams' reference in the background.
 
The book allowed me to keep it solid work flow and this was the first animation I did which looked the strongest and in the least amount of time in comparison with the previous two. It helped me to understand many areas of the body that move during a walk cycle that I would not have initially picked up on. One of the main ones being that when walking our feet usually never leave more that an inch off the floor to conserve energy. Clavicles rotate forwards and backwards, up and down in different passing stages. Below is peer feedback on my walk cycle from the online forum we use on Facebook.
 
Again, not heavy on the comments but my peer pointed out an area I was overlooking. The camera angle emphasized the snap on the arm movement, however it didn't look anywhere near as bad in different positions. Yet the camera angle was in optimum position for the rest of the cycle. When I render this out I will probably have a 360degree camera so the audience can see all aspects of the technicalities. One of the areas I did overlook was the head movement which was recently pointed out to me by my tutor. It kept very straight throughout the cycle. Even though it went up and down in the different stages it did not rock slightly side to side. This looked much more natural when rectified. 


Part 2 - Dive and Roll Animation


Part 2 - Dive and Roll Animation
 
 
The second animation I did, (which I worked on in 2014 Maya as I couldn't get 2016 at home, as you can see by the rig) I began to gain confidence after my first attempt and this clip sees the character do a jump, dive and roll. The timing lets this animation down as it is very quickly paced. However once I'd spent so much time with the in-betweens and polishing, it was too late to change as the dope sheet was a complete mess. (Lesson learnt). Below you can see I uploaded to the Visual Design forum we have on Facebook, but it is very difficult to get feedback at times as you can see.

 The part I like about this clip is the anticipation at the start as the character crouches, and the pose as he glides through the air. There are quite a few principles of animation used in a short period of time, especially when the character rolls which was challenging tucking the head and body under. However, where the clip really lacks in technicalities is the final position which arguably ruins it as this is the lasting image the audience will see. The end pose has surpassed exaggeration to the point it looks awkward. Subsequently, I did not pursue this animation as it wasn't one listed in the initial brief but was going to be an extra. That pose can be seen below.


Part 1 - Kick Animation


Part 1 - Side Kick Animation
 
 
The kick animation I worked on was purely developed on the technicalities of a Taekwondo style sidekick. As this was the first animation of the assignment, instead of focusing on adding character into the animation, I made sure that I nailed down the fundamentals.
 
One of the most challenging parts of the animation was keeping the center of gravity in the correct position. (Pictured above). The reference I used was by an online tutor on YouTube. Once I took screenshots of certain parts of the movement, I imported them into Maya and moved the rig accordingly. Once I was happy, I pushed the positions and exaggerated them slightly more than their realistic positions as it looked very rigid and boring prior to this.
 
Below, you can see I received feedback from one of my peers on the Visual Design forum we have on Facebook for our creative lessons.
 
When trying to gain a drag on the foot, it dipped through the floor level very slightly which I initially missed. This was rectified and kept a truer arc motion.
 
 
The scene showed above was the most challenging aspect of the kick. This is a few frames after the leg is being brought back down and at first it looked horrendous. After trying to figure out just exactly what was wrong, I put it down to the knees and hips moving in opposition which gave a 'pop' effect on the leg. This really stood out on playbast. Of course when moving the hips, the spine had to follow and the position of the other leg and so this took a large portion of my time up on this clip.
Given the opportunity, this is one of my animations I would go back and alter.